Generating Execution Plan
Generate Execution Plan functionality generates execution plan in XML format from TRI2 data. Task promised due date will be taken as start date of the task, if it is provided, otherwise current date will be taken as task's start date.
The generated execution plan contains:
- High Level Tasks (Summary Tasks) for Project, Workflow, Issue and Child Workflow
- Low Level Tasks, which are tasks of the Workflow, in which Issue is available
- Duration, Start, Finish, Predecessors, Resource Names columns are set with values
- % Complete, Baseline Start, Baseline1 Start, Baseline Finish, Baseline1 Finish columns are also set with values, but these are invisible columns
Navigation
- Access MPP Integration -> Generate Execution Plan

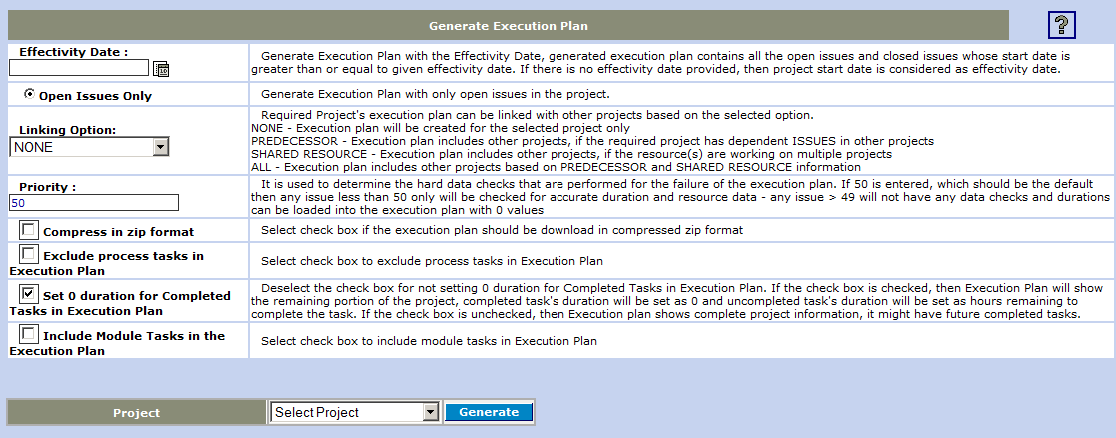
Figure 40
- For generating the execution plan by considering issues between effective date and till date, select the Effectivity Date radio button and then select the Effective Date. For generating the execution plan by considering open issues, select the Open Issues Only radio button.
- Select required value from the Linking Option combo box.
Options:
NONE
|
Execution plan will be created for the selected project only.
|
PREDECESSOR
|
Execution plan includes other projects, if the required project has dependent ISSUES in other projects.
|
SHARED RESOURCE
|
Execution plan includes other projects, if the resource(s) are working on multiple projects.
|
ALL
|
Execution plan includes other projects based on PREDECESSOR and SHARED RESOURCE information.
|
- Set Priority - It is used to determine the hard data checks that are performed for the failure of the execution plan. If 50 is entered, which should be the default then any issue less than 50 only will be checked for accurate duration and resource data - any issue > 49 will not have any data checks and durations can be loaded into the execution plan with 0 values
- Select Compress in Zip format checkbox to download the Execution Plan in zip file
- Select Exclude Process tasks in Execution Plan checkbox for not to include Workflow tasks in the generated execution, but Child Workflow tasks always available in the execution plan for grouping purpose.
- Select Set 0 duration for Completed Tasks in Execution Plan checkbox to set 0 duration for all completed tasks in the execution plan. By default it is selected, if it is unselected, then the execution plan contains completed tasks with duration and their start dates might be future dates, if those tasks are early completed the resources.
- Select Include Module Tasks in the Execution Plan check box for including module names as summary tasks in the generated execution plan.
- Click on the Generate button to generate execution plan for selected project
- Save Execution Plan (XML file / ZIP file)
- Open this xml file using Microsoft Project application.
Note: Generated Execution Plan from TRI2 (XML file) doesn't contain Resource Leveling and Scheduling. Resource Leveling and Scheduling should be done in MS Project (Open XML file in MS Project 2002). MS Project 2002 with Prochain provides the best resource leveling and scheduling.
Prochain Scheduling
Prochain Scheduling is enabled in MS Project 2002, where Prochain software is installed as macro. To run Prochain Scheduling on generated execution plan, do the following things:
- Open generated execution plan (XML file) in MS Project 2002 with Prochain
- Click on Prochain Scheduling in Prochain toolbar, it opens a dailog box
- Select Level Load tab, click on Execute button, which resolves overloaded resources
- Select ID Critical Chain tab, click on Execute button, which indentifies Critical Tasks
- Save the updated plan as XML file to upload back to TRI2 for updating task/issue due dates
When can Generate Execution Plan report errors?
There are three cases where Generate Execution Plan reports error about Recursive Predecessor(s) occurrence in the Project, which leads to memory leak in the system.
- When an Issue Number is set as Predecessor to the same Issue
- When Issue A is set as Predecessor to Issue B, and Issue B is set as Predecessor to Issue A
- When Issue A is set as Predecessor to Issue B, Issue B is set as Predecessor to Issue C and Issue C is set as Predecessor to Issue A
