Steps in Creating a Process Using the Designer Tool
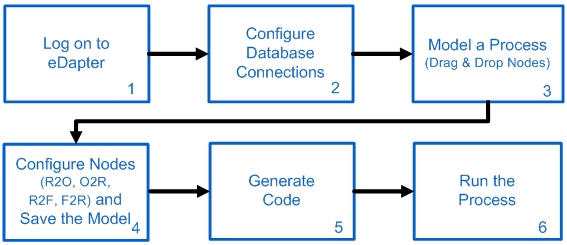
The following are the steps involved in creating a process using the Designer tool. Log on to the eDapter Toolkit application and configure the database connections. Then build a process using the nodes available in the Designer (refer to the section Nodes Area in About User Interface and Navigation). Configure the nodes and save the model. Finally, generate code for the model.

Creating a Process_Figure 2: Steps in creating a process
- Step 1 is the procedure to log on to the eDapter application. Refer to section, About User Interface and Navigation.
- Step 2 configures the database connections. It includes steps involved in connection administration, database configuration, generating classes, configuring sequences, generating code and so on. Refer to Configure Connections in the section Creating a Process for more information.
- Step 3 describes how to model a process by clicking and dropping nodes on the work area and then connecting them using the connector nodes.
- Step 4 details how to configure nodes and save the model. It also includes details about adding select groups, query creating options, adding conditions, adding destination, mapping destination, generating code and so on. Refer to section Nodes Configuration for detailed steps.
- Step 5 explains how to generate code for a modeled process.
- Step 6 explains how to run the modeled process using Instance Runner.
