You see five tabs on the fourth pane as shown in the figure below:
![]()
Figure 103:
Column Info
Click this tab to set column characteristics for properties. The column characteristics include TabName, DataType, Format, DefaultValue, and Property Type. See the below figure for column characteristics.

Figure 104:
TabName |
Enter a name for tab under which the selected property appears. You enter a tab name only for parent class properties. For example, in TPM-SAP, the parent class for a node is SapItem.java. Therefore, only for variables (properties) in this class, you enter tab names. You need not enter tab name for properties of child classes. The tab names that you enter will appear on the TPM application for end users. The standard tab names that appear on TPM-SAP are BOM, Material, BOM Component, BOM Substitute, and Quota 1. You can see all the assigned properties under each tab. |
Data Type |
This column displays the data type of the property. The data type is taken from the class structure and you need not enter any value in this column. |
Format |
Specify the format of the data that you can enter for this property. If the data type is string, you can specify the fixed length of text that the user should be allowed to enter. If the data type is date, you can specify the format of date. Double-click the cell to invoke the date format dialog. See the below figure for date format dialog. |
Default Value |
Enter default value for the property. The default value should be of the same data type that appears in data type column. The following token replaces the actual value at the time of execution: USER NAME - Replaces actual user name who logged in ROLE NAME - Replaces actual role name who logged in SYSDATE - Replaces actual system's current date $LOGGED_USER$ - Replaces actual user name who logged in $LOGGED_ROLE$ - Replaces actual role name who logged in |
Property Type |
The property type can be Normal, Document, Application Link, Password field, Multiline. Click the cell to see this list. |
The following is the Date Format Dialog box:
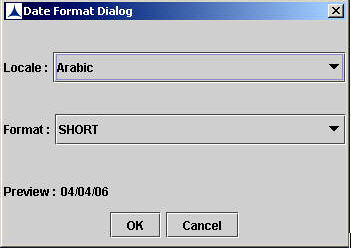
Figure 105:
The following table describes the property types in the Column Info tab:
Normal |
Choose Normal if the property value taken from a LOV, FDT, Concatenation or auto number. |
Document |
Choose Document if the value of the property is a document that you need to upload. |
Application Link |
Choose Application Link if the value of the property invokes another application. If you choose Application Link as the property type, then you need to specify the application name, and workflow type name. Click the corresponding cell in the next column to invoke Application Linking Dialog. From this dialog, specify the application name, and workflow type name. |
Password Field |
Choose Password Field if the value of the property is a password. |
Multiline |
Choose Multiline if the value of the property is description or multi-line text. |
Display Info
Click this tab to specify display characteristics for the properties. When you click this tab, you see the following columns: Tooltip, Display, DisplayOnTree and Mandatory. The following figure displays these columns:

Figure 106:
Tooltip |
Enter a brief description of the property. This description will appear as tool tip in the application. |
Display
|
Select this checkbox if you want the selected property to display for the node in the application. Typically, you will not use all the properties for a node. Select the Display checkbox for the properties for which users enter value. |
DisplayOnTree |
Select this checkbox if you want this property value to display beside the node in the application. For example, in TPM-SAP, material and BOM usage property values appear beside a node. |
Mandatory |
Select this checkbox if you want to make this property a mandatory field. The application displays mandatory fields with a red background. |
LOV Info
Click the LOV Info tab to specify FDT information for a property. When you click this tab, you see four columns, namely, URL, Fdt, Parameter and AutoLOV. The following screen shows the columns.

Figure 107:
URL
|
Specify URL of another FDT server that you want to connect to. When you specify a URL in this column, the LOV is taken from the FDT server (corresponding to this URL) and not from the default FDT server that the application is directed to. |
FDT |
Under this column, click the cell corresponding to a property to see the list of available Find Definition Templates (FDT). Select an FDT that provides a list of values for the selected property. |
Parameter |
Under this column, click the cell corresponding to a property to see the list of parameters in the selected FDT. Select a parameter that suits the property. |
AutoLoV |
Select this checkbox to assign output of the LOV (all values) as value for the property. You can assign AutoLOV only for the child class properties. TAB doesn't allow you to select AutoLOV for parent class properties. |
Conditional Info
Click the Conditional Info tab to specify conditional characteristics for a property. On clicking the tab, you see five tabs, namely, InheritFrom, Conditional, AutoNumber, OverRide and UpdateIfQuery. The following screen displays the columns.

Figure 108:
InheritFrom |
You use this column when you want a property value to be inherited from its parent node. Click a cell under this column to see a list of items from which the property value can be inherited. Currently, TAB supports inheritance of a property value only from parent node. Choose Parent from the list and then click OK. Now you need to select a property of the parent node that will be taken as value for the selected property. Click the button (that appears in the last column) in the last cell of the row to see a list of parent node properties. Choose a property, and then click OK. |
Conditional
|
In this column, you specify conditions to a property value. The property value can be a function of some other property, concatenation of two or more other properties, or follows simple rule. |
When you click a cell under the Conditional column, you see the following dialog box:
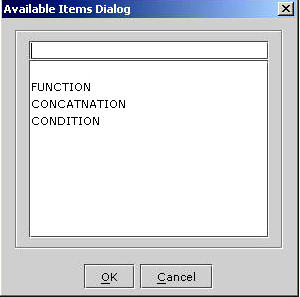
Figure 109:
Function: Choose Function only if the data type of the selected property is either string or integer. Currently, TAB supports substring() function (for properties of type string), and inverse() function (for properties of type double).
Click the button in the last cell of the row to see the conditional dialog box. In the conditional dialog, you can choose either INVERSE or SUBSTRING function.
From the conditional dialog, you need to select a property that will be used by these functions.
When you choose substring function, you need to specify the position of the starting character and the ending character.
Concatenation: Choose Concatenation if the value of the property is the result of concatenation of two or more other properties. Click the button in the last cell of the row to see the selection dialog box. Select a separator from the list, and then select the properties that need to be concatenated.
Condition: Choose Condition if the value of the property is governed by a simple rule that you define. You define this rule based on the following operators: less than, greater than, less than or equal to, greater than or equal to, equal to, not equal to, between, and in. Specify condition only for the integer, and double data types.
AutoNumber |
Select this checkbox if the value of the property is taken from a pre-defined auto number. Click the button in the last cell of the row to see the available list of auto numbers. Select the auto numbers from which user can select a value for the property. |
OverRide |
Select this checkbox to enable the user to enter a value that overrides all the pre-defined conditions. |
UpdateIfQuery
|
Select this checkbox if you want to enable the user to modify the property of the node while updating models in the ERP. The properties for which this checkbox is selected are not editable while building a model, but the same properties can be modified when you retrieve a model from SAP / Oracle database and update it. |
Key Info
Key Info consists of two tabs, namely, Business Key and System Key.

Figure 110:
BusinessKey |
Select this checkbox if you want to select a property to be a business key. |
SystemKey |
System key is used to pass a property of a model or node from one application to another. Select this checkbox if a property needs to be passed to another application. |
Configuring Custom Url in Node Configuration:
Query the Workflow in Workflow Designer, and select required state, and required node type.
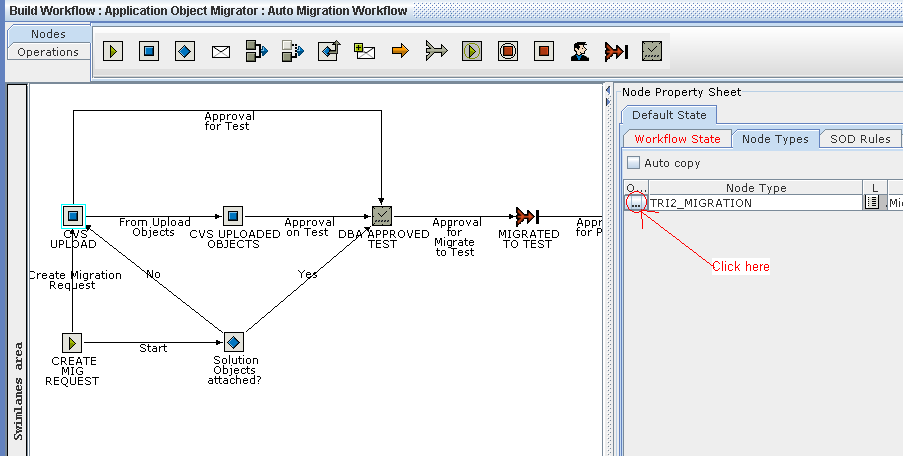
Figure 111:
Select the Property, and select its Property Type as Document as shown below.

Figure 112:
Click on Document Properties Configuration Button, then a Dialog will be opened as shown below.

Figure 113:
On clicking the above button the below screen is opened.
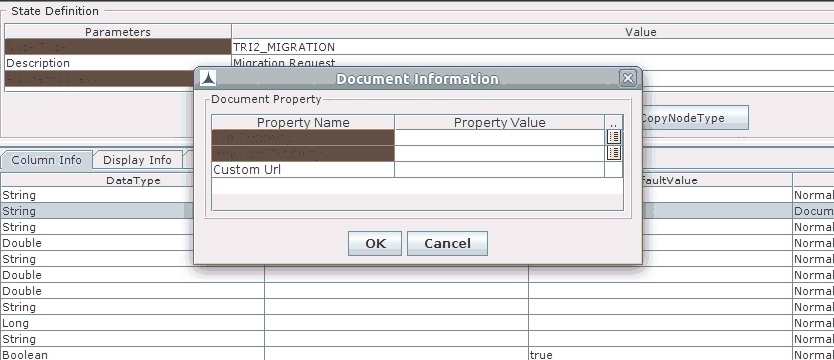
Figure 114:
Fill the File Property, Revision Property & Custom Url(Non mandatory) & click on OK button to save the configuration
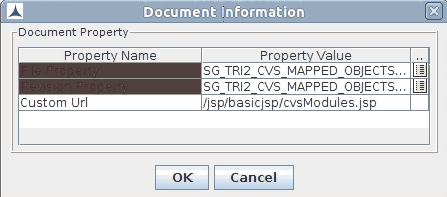
Figure 115:
Open the Workflow in Front-end, and select required state and click on Workbench

Figure 116:
Click on the configured Property, then the given Custom Url is opened in a popup.
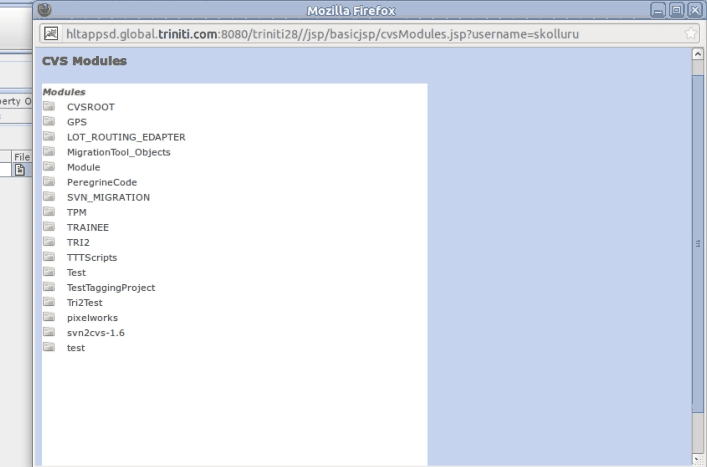
Figure 117:
The Custom jsp developer must write the dispose action in such a way that the jsp should set File and Revision properties to its opener in the form of <File Property>#<Revision Property>, then <File Property> & <Revision Property> will be set to the Configured Fields.

Figure 118:
If Custom Url is not specified in the configuration, the following popup will be opened.
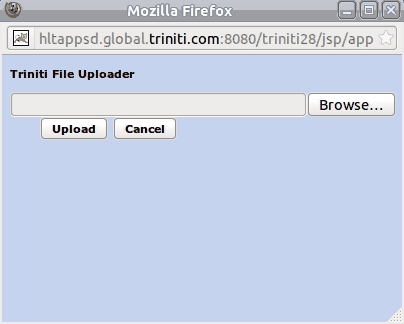
Figure 119:
Browse the file location on your system and upload the file, then <File Property> & <Revision Property> values will be set to the Configured Fields.