Configuring a Node Type
Configuring a node type involves assigning a node object, and then setting properties for the node object. Every node type in an application is based on one node object (a java class) that encapsulates all the possible properties of a node.
To configure a node type:
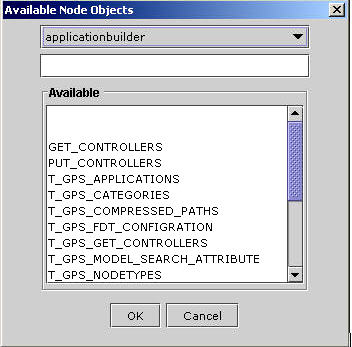
- Select an eDynamo class from the list of values. You see the following dialog listing the available eDynamo classes in an application.

Figure 100:
- Choose the application name from the list by clicking the down arrow. You see all the eDynamo classes defined for the application.
- Select a node object from the list, and then click OK.
Note: The node object that you select must be a parent object to all other objects that appear on the list. A node object is a Java class that encapsulates the variables of basic type as well as user-defined type. Typically, all the nodes are based on the same eDynamo class.
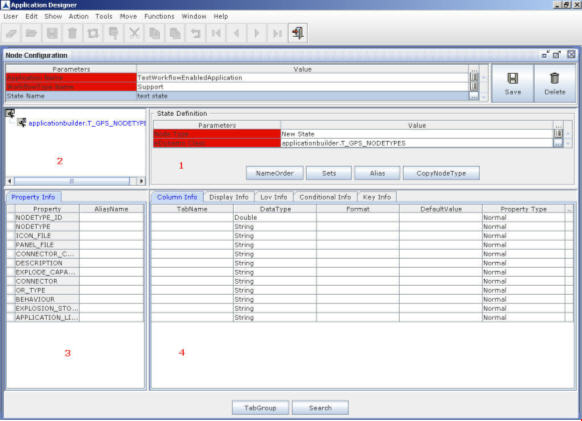
- On selecting the eDynamo class, the screen appears as shown in the below figure:

Figure 101:
- The above screen is divided into four panes. The second pane (see the number in red color) displays the child classes within the parent eDynamo class, which appears as the parent node. These child classes can also be parent classes to other child classes (expand the node to see the child classes).
- The third pane displays all the basic type variables (of type integer, string, Boolean) within the class that you select in the second pane.
- The fourth pane allows you to set values for the properties displayed on the third pane.
- The second column in the third pane displays property name (this name is nothing but the variable name defined in the eDynamo class).
- In the third column, enter alias name for each property name. Only the alias names will be displayed to the user.
- The fourth pane consists of five tabs which are explained in the next topic Configuring Node Properties. After configuring the node properties, click Save to save the node configuration as shown in the figure below:

Figure 102:


